Thẻ: SharePoint Online

  • Xử lý lỗi bị “Access Denied” thư mục Share của User bị trùng với User đã từng được tạo nhưng bị xóa trước đó trong một tổ chức

    Xử lý lỗi bị “Access Denied” thư mục Share của User bị trùng với User đã từng được tạo nhưng bị xóa trước đó trong một tổ chức

    Vấn đề cần xử lý:

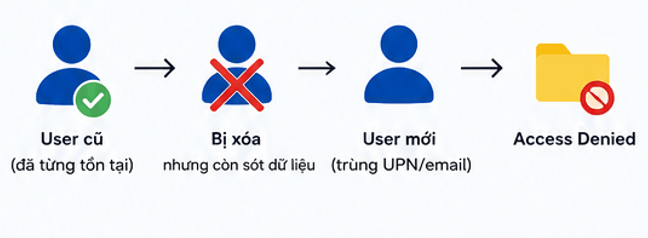
    – Bạn A có email a.b@domain.com được share tài liệu 123. Sau đó bạn A nghỉ việc, email a.b@domain.com cũng bị xóa khỏi M365

    – Sau 1 thời gian dài bạn B vào làm được tạo email a.b@domain.com và cũng được share tài liệu 123, tuy nhiên khi truy cập vào đường link share (OneDrive, SharePoint) thì trả kết quả về là Access Denied dù người share đã chọn đúng tên và đúng phân quyền.

    Từ khóa cần tìm kiếm: “Fix site user ID mismatch in SharePoint or OneDrive” và làm theo hướng dẫn để chạy troubleshooting trên tenant của Microsoft 365 Admin.

    Cách xử lý 1:

    Vào đây tìm đúng cái tên người cũ xóa đi, cái này Microsoft nó lưu cache thường thì tầm khoảng 1 2 tháng sau khi xóa tài khoản hẳn khỏi hệ thống nhưng người dùng nối tiếp vào dùng sẽ giữ lại tài khoản đó nên sẽ bị như thế.

    Cách xử lý 2:

    Vào SharePoint admin center -> Setting -> Site Setting -> People and Groups : Members -> Kiểm tra và xóa User đã tồn tại.

    Click vào thư mục cần Share -> Xem phần Manage Access -> Nhấn chọn phần có icon dấu 3 chấm để kiểm tra phần Advandced setting -> Đến phần People để kiểm tra

    Cách 3: Chạy lệnh theo hướng dẫn

    Link: https://learn.microsoft.com/en-us/troubleshoot/sharepoint/sharing-and-permissions/fix-site-user-id-mismatch

    Link: https://learn.microsoft.com/en-us/answers/questions/908524/onedrive-site-user-id-mismatch

    Cách 4: Tham khảo thêm các trang khác

    Cách 5: Liên hệ Microsoft cho nhanh

    Cách 6: Tạo 1 user khác đi :v

  • Steps to rename your SharePoint domain

    Steps to rename your SharePoint domain

    Verify the New Domain:

    Ensure that the new domain name you want to use is already verified in your Microsoft 365 account.

    Open SharePoint Online Management Shell:

    Launch the SharePoint Online Management Shell on your computer.

    Connect to SharePoint Online: Use the following command to connect:

    Connect-SPOService -Url https://<your-tenant>-admin.sharepoint.com

    Schedule the Domain Rename:

    Execute the command to schedule the rename:

    Start-SPOTenantRename -DomainName <new-domain>.sharepoint.com -ScheduledDateTime

    <datetime>=>Replace <new-domain> with your desired domain name and <datetime> with the scheduled time for the rename.

    Example: 

    Start-SPOTenantRename -DomainName sgphopr -ScheduledDateTime "2024-11-13T23:59:59"

    Or:

    Start-SPOTenantRename -DomainName "sgphopr"

    After, paste time (your time):

    2024-11-13T23:59:59

    Check the Status of the Rename:

    To monitor the status of the rename operation, use:

    Get-SPOTenantRenameStatus

    Finalize the Rename:

    The domain rename will be processed automatically at the scheduled time.

    Important Considerations

    Limitations: You can only rename your domain once, and reverting to the original name is not supported.

    Redirects: A redirect from the old domain to the new one will be created, lasting for one year.

    User Communication: Please inform your users about the change to avoid confusion and ensure a smooth transition.

    Article to refer on: https://learn.microsoft.com/en-us/sharepoint/change-your-sharepoint-domain-name

    Note:

    If an error occurs:

    Start-SPOTenantRename : Error Code: -757,The domain name isn't valid. At line:1 char:1 + Start-SPOTenantRename -DomainName fastae -ScheduledDateTime "2024-11- ... + ~~~~~~~~~~~~~~~~~~~~~~~~~~~~~~~~~~~~~~~~~~~~~~~~~~~~~~~~~~~~~~~~~~~~~ + CategoryInfo : InvalidOperation: (:) [Start-SPOTenantRename], Exception + FullyQualifiedErrorId : Error Code: -757,The domain name isn't valid.,Microsoft.Online.SharePoint.PowerShell.Sta rtSPOTenantRename even though the domain fastae.com has been verified

    I noticed that the error occurred because the domain was added to the tenant, but the onmicrosoft.com domain wasn’t created yet for that new domain.

    To fix this, please follow these steps:

    Go to Settings > Domains.

    Click on the onmicrosoft.com domain in your tenant.

    Look for the option to Add onmicrosoft.com domain (Preview) and add it.

    Once you’ve done that, you can proceed with the steps I shared earlier.

    Or please contact to support Microsoft.